Painting Disney Purses

Hello and welcome to my Blog! In this post, I’m going to show you how I took these purses and painted them with Disney characters!
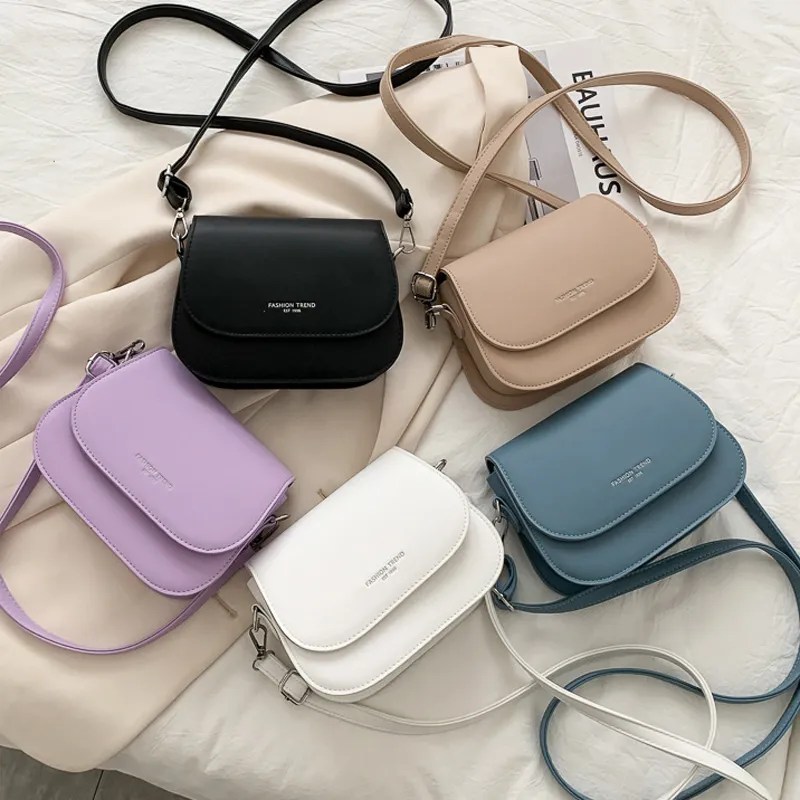
the purses

A few months ago, I bought these cute purses through a wholesale website. When I first started selling on Etsy, I actually started with painting jackets and purses with different character art. My first sale was a green Loki jacket. But when I started painting wood letters, I left that behind and thought it was time to start again. Of course my first thought for these bags was Disney characters! I actually picked out characters for all six of the purses, but I painted two of them back in February and I got tired of waiting to release the video.

WHAT PAINT TO USE

With faux leather items, I always use Angelus leather paint. It’s a really great leather paint that is waterproof and scratch proof, and I can confirm I learned that the hard way when I messed up while painting a spider-man jacket. It only took me five seconds to get to the sink and by then it was already too late. But if you paint anything and make a mistake, rubbing alcohol is your best bet to get it removed. Let’s get onto the painting.

purse 1: Steamboat Willie

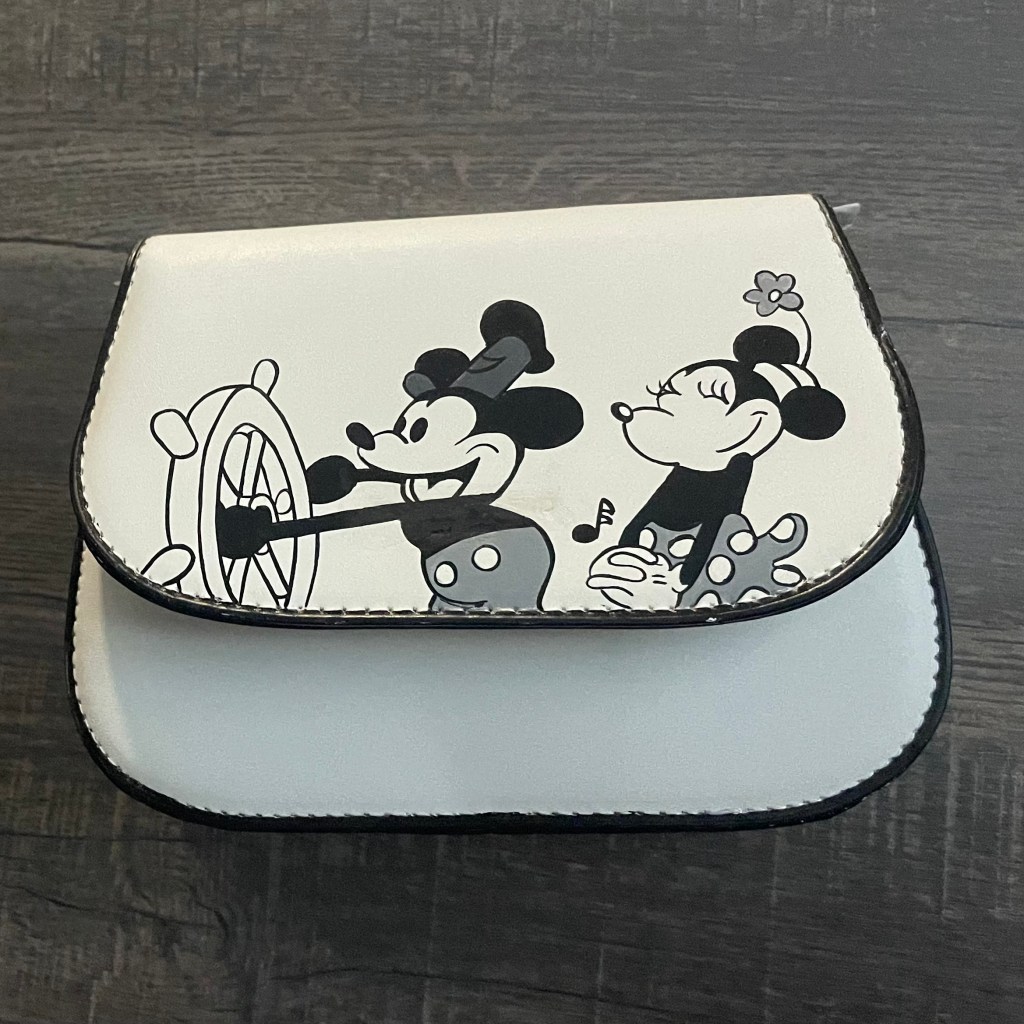
For the first purse, I really wanted something black and white. I had already decided that one of these bags would have Mickey Mouse, and with the black and white idea in my head, I started looking at steamboat willie pictures. But first, I wanted my bag to have a black border. I painted the edges past the stitching, making sure to get every side.

Normally when I paint on leather, I paint my sketch in white leather paint because it’s the easiest color to cover up, but I couldn’t exactly do that with a white purse. So I grabbed a pencil instead and got to work drawing. Unfortunately I couldn’t record this because the light made it hard to see my pencil lines and I had to get really close to paint it. With my sketch complete, it was time to paint!

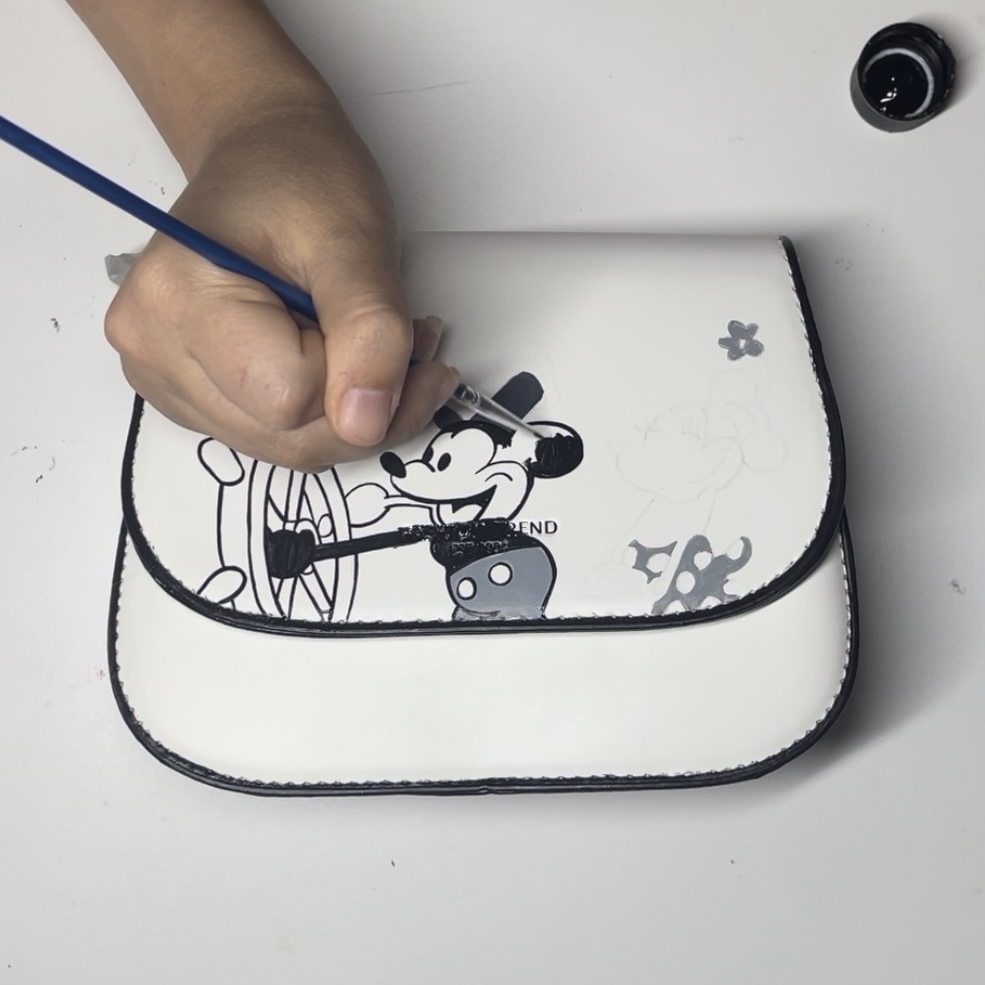
Luckily I had all the colors so mixing paint wasn’t necessary. The colors I used were “Light Grey”, Dark Grey, and Black. With leather paint, it’s best to work in thin coats and to let them dry really well before painting the next coat. If you paint another coat too soon, sometimes it lifts the paint on the layer before and makes things really patchy. 

pURSE 2: Stitch

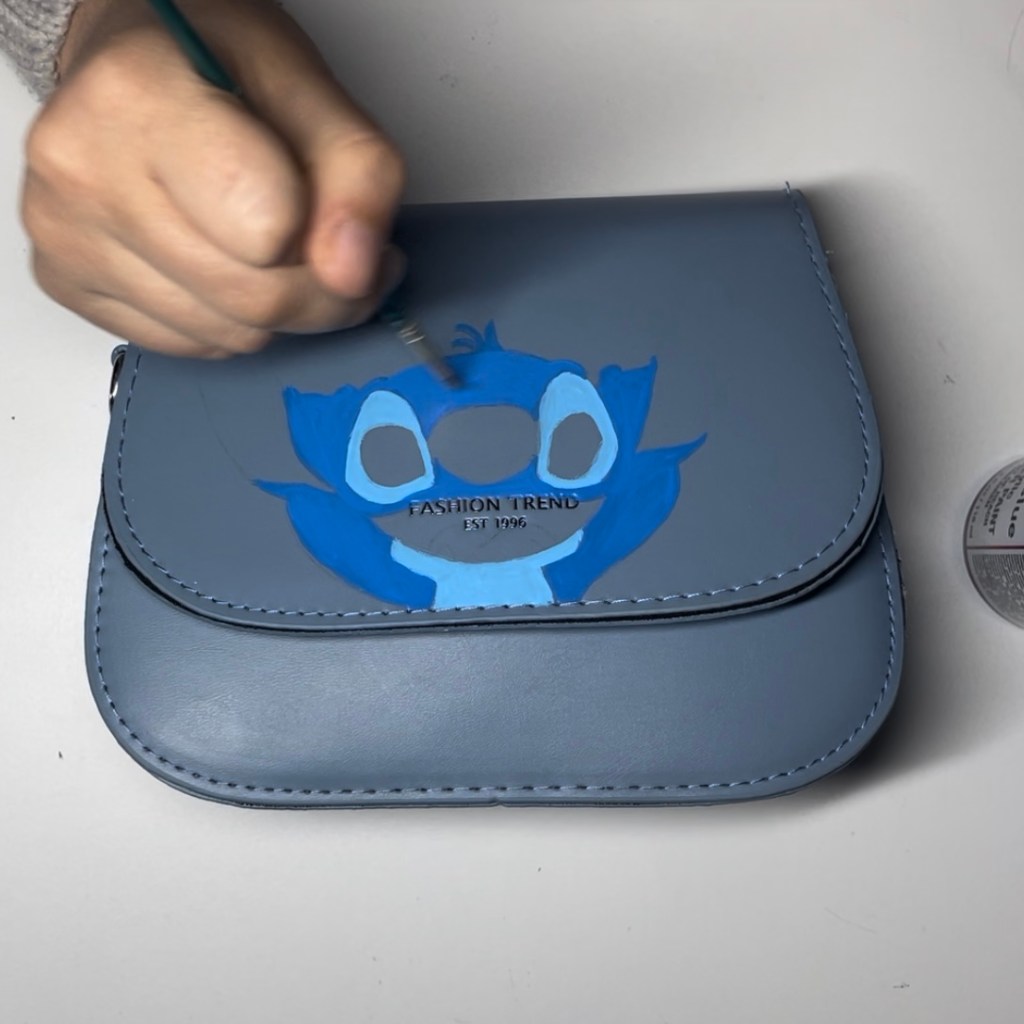
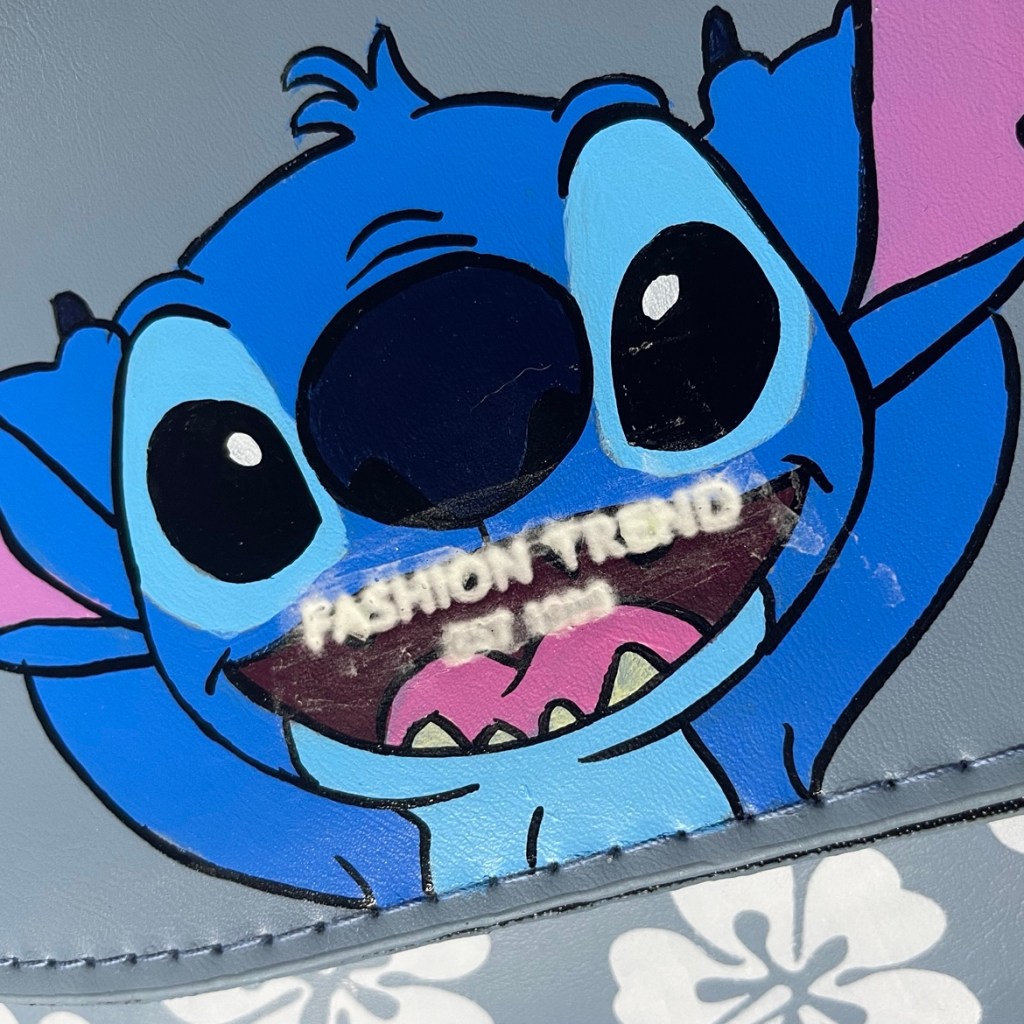
For the blue purse, I thought it was just grey enough where I could paint Stitch. Lilo and Stitch was one of my favorite Disney movies as a kid, and I had the perfect picture for the bag. For this purse, I used Pale Blue, Light Blue, Hot Pink. For his ears, I did have to mix paint. I mixed together hot pink and lilac to get the perfect shade.

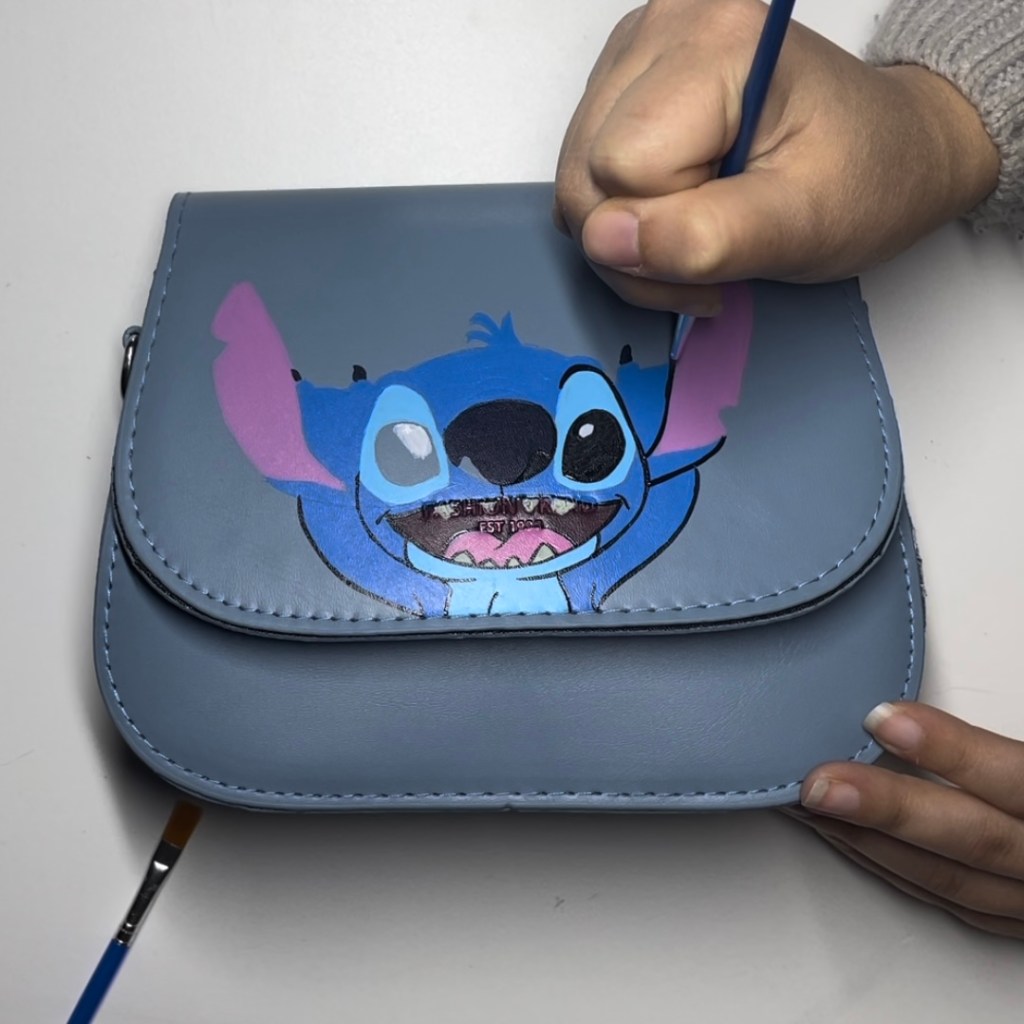
I then used burgundy for the inside of his mouth, white for the eyes of course, and Navy blue for the nose. For stitch’s teeth, I needed a yellowed white, so I mixed white, pale yellow, and some light grey. Finally it was time for the line art. I grabbed my fine point paintbrush and used my black paint to finish my painting.

I could have stopped here, but I couldn’t get this hawaiian flower pattern out of my head. Using the cricut design space, I uploaded a floral pattern and made this stencil, making sure I had a circle opening at the center for the magnetic clasp. I cut the stencil on stencil vinyl and weeded out the pattern then used masking tape to transfer the stencil to the bag. Whenever I use stencil vinyl to paint, I never use a paint brush.

Using a paint brush always makes it streaky and more likely to bleed under the stencil. I love using makeup sponges to stamp on the paint instead in order to get an even coat. Once I finished, I removed the stencil vinyl and used a paint brush and some rubbing alcohol to clean up the places where the paint bled through. You do have to work fast though because if you wait too long, the paint might not come off. 

After I finished the purses, it was bothering me how noticeable the purse metal text was even covered in paint. I bought a paintable filler on the Angelus website and used my bone folder to fill in those spaces and try to get it as smooth as I could. All that was left was to repaint the covered section and the purses were finished!!

THE FINAL PRODUCTS!

What’s Next?

I am planning on painting the remaining bags eventually. I already have the characters mostly planned out. I have my sketches finished for Ursula, Hades, and Eeyore ready to paint.

I am selling these purses on my Stargazer Artistry Etsy, home to all geeky products. 

I recently started a Patreon where I am uploading any stencils and images I use in these videos, but since I’m having a slow start, there isn’t much on there. But I’m excited to get it running. I really hoped you liked this video. If you did, please like it, and subscribe if you want to see when future videos are up. If you have any suggestions or requests for either DIY videos or characters you want me to paint, comment down below. Even though this isn’t exactly a tutorial, I do have all the materials I used linked down in the description. Thank you for watching and I’ll try to get the next tutorial uploaded soon. Bye.

Faux Leather Bow Tutorial

Hello. Welcome to my blog! Today, I’m going to show you how I make these cute faux leather bows.

I first started making these bows about three years ago, in 2020 and the reason was. Originally I wanted to make those big ribbon bows that other sellers have, but I was having a hard time trying to get my designs to look good in ribbon. Then I saw paper bows and I thought, what if I made them with leather so it’s more durable and stiff enough to be painted on. 

WHAT YOU NEED

These bows are actually simple to make. The first thing you need is the faux leather which is better sold by the yard. Originally, I was purchasing the leather from an Etsy seller, but I ran into a problem with consistency. I had ordered one yard of each color to start, but one day I ran out of red and when I ordered more, the new shipment was a much brighter red and I couldn’t use it for some of the designs because the color didn’t match. Then my mom found a vendor that I switched to and luckily they had both shades of red.

The bows consist of a total of four pieces. The back piece, the center bow, the top bow, and the center strip that keeps it all together. 

THREE CUTTING METHODS

METHOD 1: TRACING BY HAND

There are three methods of cutting the pieces. The first one is what I originally did when I first started, which is to use a paper stencil. I purchased the bow template from an Etsy seller and printed it on cardstock, then cut out the shapes. Then using the stencils trace the shape onto the back of the material and cut them out. This is the method to use if you can’t afford the equipment to speed things up. If you’re doing this, I recommend using a felt tip pen because if you use a ballpoint or marker, even though the marks are on the back of the material, the ink still bleeds through and stains the edges after you cut them. With a felt tip pen, I’ve never had this issue.

METHOD 2: USING A LEATHER CUTTER

The second method is to use a leather press. A leather press is this heavy duty press that is used to punch out the shapes. It uses these leather cutters which you can find from online sellers, or order them custom made like I did. What you do is first cut the leather into rectangles big enough for the shape, then you place the sheet on top of the cutter and slide it under, then punch out the shape. I would say this method is much faster than tracing because drawing straight lines is faster than tracing the stencil over and over. It also leads to much smoother cuts.

Unfortunately, the issue I did run into was that I couldn’t get it to completely cut the piece cleanly. The cutters weren’t flat, so I would have to punch it, then very carefully slide the cutter forward and punch it again, but sometimes the leather would stick or shift. So most of the time I would just cut what was left with scissors. This method is faster, and you do get less from the material but not enough to really impact the cost per bow.

METHOD 3: USING A CUTTING MACHINE

The third method is what I currently use, and it is to use a cutting machine. I own a cricut explore air two. For this, I took my stencil and converted it into an svg cutting file on convertio. What I love about this is I’m able to create custom shapes depending on the bow I’m making. For example, for my mickey bow, I made a mickey ear back piece instead of the standard shape.

For this, I see how many of each shape fits on a 12×24 cutting mat, then I cut the leather into the correct size sheets. Then place the material face up on a strong grip mat. Two things are very important here. The first is you must use a strong grip mat otherwise the material will slide. The second thing is make sure you place the fabric side of the leather directly on the mat. Unfortunately it will make your mat wear faster, but if you put the leather side down, the glue will come off and ruin your mat along with leading to extra work cleaning off the glue from the cut pieces. I cut my leather on the bonded fabric setting on regular depth and it cuts it almost perfectly, with only a few strings left attached that I have to cut.

TWO WAYS TO DECORATE

METHOD 1: PAINTING

Once you have your pieces, this is the time to paint or decorate them. There are two options. The first is to paint using leather paint. I use Angelus brand which is very permanent and easy to apply. This method works great for small details, and designs where you want more depth, shading, or more freedom. It is important to paint in thin coats, allowing time to dry in between. If you paint your second coat too soon, it may lift the coat beneath and lead to a patchy appearance.

METHOD 2: HEAT TRANSFER VINYL

The other method is to use heat transfer vinyl. I love using heat transfer vinyl for more symmetrical shapes as well as colors that take multiple coats to apply. 

I briefly showed a total of three bows in the video. Two coco themed bows, and a sorcerer mickey bow. For sorcerer mickey, I used to use silver paint. But since the painted parts are stars and a moon, I switched to HTV for cleaner, opaque shapes. I use a cricut silver HTV, and using my mini cricut iron, with a piece of parchment paper between, press for only five seconds. With small vinyl pieces, it’s important to not heat them for too long or else the vinyl will melt and stick to the plastic rather than the material. For the coco I also used HTV, which was a bit more time consuming because the details were so small, I had to be very careful when weeding the vinyl since not all the shapes were completely cut.

GLUING THE PIECES

Once you have your pieces, the last step is gluing. Originally, I was using contact cement to glue the pieces, but although the glue was strong, it dried too quickly. I ended up switching to E6000 which has worked great. Apply the glue to all three points, then close the bow and use an alligator clip to keep it together until it dries. Once those pieces are dry, use the glue again to glue them together.

Finally, it’s time for the center strip. I usually can get these using the scraps from cut pieces. I cut long strips and cut them as I go. Apply the glue to the center of the bow then position the strip. Next apply glue to the end and wrap it around. Hold the bow until it’s dry, then slide the alligator clip through and push down, making sure it’s all holding together.

THE RESULT!

That’s how you make a leather bow! I sell these bows for $6 each on my Etsy. I sell the character themed ones on Stargazer Artistry, and other designs on Stargazer Lily Boutique.

If you found this tutorial helpful, please hit the like button. If you’re interested in seeing more tutorials, please subscribe. Have a craft project you’re curious about? Then comment down below and I’ll give it a shot. Thank you so much for watching.

Painting Animated Characters

I used to paint canvases all the time, I hadn’t in a few years. Since my painting skills have improved over the years, I decided it was time to get back to it.

Where do I get my canvases?

Michaels is a great source for good canvases, at least for someone who doesn’t paint exclusively for their career. They often have wonderful bulk discounts, and the canvases come primed, the corners are smooth, and the base is stretched tightly. Earlier last year, I purchased a 12-pack of 10″x10″ level 3 canvases for a great price, but they had been in their storage container for far too long.

Deciding what to paint

VANELLOPE (WRECK IT RALPH)

I knew I wanted to stick to animated characters, but I didn’t want to limit myself to a particular style. When I decided I was going to paint fictional characters, I asked my mom if she had a preference. She selected Vanellope von Schweetz as my first subject. For those of you who don’t know who that is, Vanellope is a quirky and energetic character from the Disney animated movie, Wreck it Ralph. She is an outcast racer in a racing arcade game with a candyland style. Since she is a 3-D animated character, I at first worried I would be unable to capture her energy and adorable appearance.

SESSHOMARU (INUYASHA)

Next I asked some friends to tell me who some of their favorite animated characters were. One of the girls recommended a few anime characters who were familiar to me. As soon as she gave me her list, I just had to paint Sesshomaru. Sesshomaru is a character from the Japanese anime, “Inuyasha”. He is the demon half-brother of the titular character. He is an antagonist at the start, but eventually became a common fan favorite due to a subtle shift in his nature. He was actually a little more difficult to paint because of the many line details, but I was happy with the result.

PIKACHU (POKEMON)

Another recommendation from a friend was to paint Pokemon characters. As someone who only watched the first two movies and played one of the nintendo ds games, but never watched the show very much, I am not familiar with many of the Pokemon. But it’s impossible not to know who Pikachu is, so I decided he would be the first to paint. Pikachi was definitely the easiest of these three characters to paint due to the simple 2-D animated style.

Capturing the process

Painting reels are everywhere, so I of course had to record my own. I’m still working on ways to improve how I record the process, but for now I was able to get some of Vanellope and Pikachu.

Where to find future Paintings

Of course I am planning on continuing to paint characters in the future, and hopefully improve the recording process. If you’re interested in seeing these youtube shorts in the future, you can find the link to my youtube channel on the homepage, or click here to find it.

If you aren’t interested in watching the videos, but do want to buy one of these paintings, you can find them on my other Etsy, Stargazer Artistry. The painting prices vary based on how much time was spent on them. Have a character you want to see painted? Comment below or on any of the youtube shorts. Want to order a custom character painting? Email me at stargazerartistryus@gmail.com or message my on the Stargazer Artistry Etsy.